Wild Rice, Artichokes, Dilled Salmon, and Cheddar Taieddhra

taieddrha

8188031461_122967891a_oThis month’s new Challenge brings us back to (Southern) Italy, specifically in an area of Puglia called Salento. I have never been to Salento, but read extensively about it after the new Challenge was announced. I am especially fascinated by the baroque beauty of the city of Lecce, and and even more so by the Griko, as I love learning foreign languages. As far as I can tell, based on the pictures I could find, some of Salento’s main colors are deep blues and blazing whites, and the views are simply breathtaking.  The recipe is from Cristian—his own family’s version of Taieddhra which is a traditional dish made with rice, potatoes and mussels. In the local dialect the word Taieddhra refers to the specific dish as well as the clay vessel in which it is baked. Here, we would call it a casserole.

As Cristian introduced this recipe he shared some of his own childhood memories tied to this dish. He painted a rather vivid picture of himself as a young boy enjoying a portion of taieddhra while sitting on a stonewall facing a vast corn field. As I am sure many others did while reading his post, I was struck by this glimpse into the past. It is, it seems to me, an image that evokes both peacefulness and wonder, as they are only possible in childhood.  Somehow, it moved me.
It is an interesting dish, which in its traditional form is made up of layers of rice, onions, potatoes and mussels, with the addition of zucchini, tomatoes, and a good sprinkle of grated pecorino cheese.  The raw ingredients are placed in the clay dish and baked.

I could not reproduce this dish in its original form, as mussels are treyf. It is however the method to make it that I can adapt to my own kitchen and dietary restrictions.  The idea of how I could recreate it within the boundaries of kashrut and with ingredients available here  came to me while en route to pick my son up from school.
It is over an hour drive—but I do not mind,  it is  actually one of my favorite parts of the day. Once I leave behind my small town’s Main Street, with its beautiful houses and manicured lawns, I get to drive on back roads surrounded by thick woods on each side, interspersed by ponds and the occasional cranberry bog. These days the landscape is especially gorgeous as the tender green of Spring is everywhere—and in taking in that great peace and beauty my mind always goes with gratitude to the Divine Hand that created it all.
Usually on these drives something interesting happens, to my kids’ delight— a few days ago we saw a hawk perched on a low branch and stopped the car to observe it for a while. Yesterday, I had to stop the car and wait for a terrapin to safely cross the road. Wild turkeys often show up at some point, and my youngest daughter is always waiting with great anticipation to see the corralled horses as we drive by a local farm .

As it happens, I also get to drive by some corn fields, although this early in the season the plants are still rather small and thin. And here is the connection to Cristian’s presentation of the recipe. I started to think how I could recreate it with different ingredients and yet somehow stay true to the nature of the dish.  Potatoes and onions had to be in it, but in place of the zucchini and tomatoes I thought about artichokes. In place of the mussels, salmon, and instead of the usual rice, Wild rice and American Long-Grain. To round it all up, a sprinkle of cheese and a good amount of fresh dill, straight from my garden.
The pictures do not do justice to the dish—but that’s no news that I can’t take a decent picture to save my life.  One thing I do not have to worry about is winning the 50 Millimetri Awards. Anyway, we all loved the combination of flavors and textures—I do not know whether using freshwater fish is too much of a detour from the original dish, but it did taste very good indeed.

I used mostly American ingredients—Sweet Vidalia Onions from Georgia, Artichokes Hearts and Wild Rice from California, Red Potatoes from Maine,  Wild Salmon from Alaska,  American  Long Grain Rice from Texas, Cheddar Cheese from Vermont,  and dill from my own backyard in Massachusetts. The only exception: Extra-Virgin olive oil imported from Puglia.

Incidentally, I learned a new Italian slang word: Mappazza, which in this case refers to the danger of overcooking the rice so that it turns into one sorry lump, while it should stay nice and fluffy. This danger was not so much an issue here, as much as the opposite. Given the sturdy nature of Wild rice, under cooking was more likely. Anyway, it did  not happen: presoaking and enough liquid in the casserole produced a successful result.

wildriceThe only clay baking dish I own was too small and shallow to use for this recipe, so I opted for a Pyrex one, which worked fine.

300 g Wild Salmon Fillets
4 large artichoke hearts, thinly sliced
1 sweet Vidalia onion, thinly sliced
1/2 cup American long-grain rice
1/2 cup Wild rice
1 lb red potatoes (thinly sliced)
extra-virgin olive oil
1 bunch of fresh dill
Aged cheddar cheese, grated
fish stock as needed, cold (made with salmon bones with this recipe)

Preheat the oven to 350F
Rinse the wild rice and let it soak in cold water to cover for about 1 hour. Then rinse the long-grain rice, drain the softened wild rice and mix them together.
Pour 3-4 tbsp of olive on the bottom of a baking dish, then arrange the sliced onions, followed by a layer of potatoes, then the fish and the artichokes, sprinkle with a generous amount of dill, and  finally cover everything with a thin layer of rice mix, another layer of  onions and top with potato slices. Sprinkle generously with cheese, drizzle some more olive oil, and pour enough fish stock to reach 1-inch above the top layer.
Bake for about 90 minutes. Serve at room temperature.

Thank you Cristian for this great recipe and as always Ale, Dani & Giorgia for the MT Challenge!

Notes:

1. I used a mandoline to slice the vegetables.

2. Usually in the US rice mixes are made with Wild Rice treated so that it cooks at the same time as other types of rice. As I doubt those are available in Italy, I used regular Wild rice that I soaked for a while in order for it to soften and cook in the same amount of time needed for American-Long Grain rice.

3. Generally speaking, Ashkenazic tradition allows mixing fish and cheese. However, Sephardic Jews and some Ashkenazic communities might adhere to a stricter opinion. Check with your Rabbi.

And the Winner is….

Traduzione Italiana in fondo

Cristian, with his  Chili con carne di tacchino con contorno di “salsola”, tortilla e fagioli!!!!

As always, the MTC Challenge has been lots and lots of fun. But this time I have got to be for once behind the scenes—and that was priceless.  I was delighted  to pick the recipe for the Challenge this time, and enjoyed every single entry. Every. Single. One. Which made choosing a winner really, really, really hard to do. Let me say it again—it was not easy. So, before I delve into the rationale for finally choosing Cristian’s Chili, let me mention at least a few of all the other recipes that I liked.

In general, I enjoyed seeing Chili reinterpreted in places so far away from Texas and made with  ingredients tied to a specific area, such as local cattle breeds or beans—like those made by  Cristina, Elisa, Ilaria, Sabrina, Claudia,  and Simonetta But there were also some other great versions made with venison, such as Mapi’s Valeria’s and Arianna’s . There was even one made with faux bison!

Some made outstanding vegetarian or even—gasp!—vegan chilis, like  Chiarina, Spinarosa, Elena, and Giulia.  

One objective hurdle that almost everyone had to overcome was finding chiles to use in their recipe. And this was done with brave persistence: Andrea comes to mind among all others.  Some forgot the side dish and made Chili again, like Fabiola. Others came up with interesting variations, that I would love to try, like Vittoria’s Tripe Chili.  I would love to try it, but every time I mention tripe, or liver as an option for dinner, my entire family looks at me with the horrified expression of someone that just realized their wife/mother has been replaced by Hannibal Lecter.

I especially loved reading about each participant’s family enjoying Chili made with this recipe: whether it was helpful to convince children to eat more protein,  required  fathers’ expertise in choosing the right cut of beef, or reconciled a wife to her husband’s passion for all things Western. Some took side trips to Mexico, or Spain, or  Japan, someone digressed quite a bit and ended up in New Mexico. Everybody made tortillas–and variations thereof–just like pros.

Furthermore I was astonished—and shaken— to see that some made Chili even at great personal risk.

Some voiced their skepticism—I bet shared by many—about such a simple 2-ingredient recipe. I appreciated the honesty as well as the braveness in going along with it nonetheless as I for one believe that when a virtual stranger says to you:  “trust me” , the only sensible response is to back up slowly and then run in the opposite direction.

I loved every memory and story that were shared, and most of all I was curious to see America through the eyes of someone who lived so far away and had experienced it only through movies, books, or short stays for work or vacation. Whether your entry was mentioned or not here, I read them all many times and in  each of them I found something special and meaningful.

Thank you all!!! And a big bear hug to Ale & Dani!

And, now, here is what made me opt for Cristian’s recipe in the end.  It was not the whiskey, per se, that he interestingly added to the pot along with the chili, nor just the fact that he used turkey meat, perfectly cooked. What I liked the  most  was the idea of making an edible form of tumbleweeds. Yes, that’s it. It was clever, it was funny, it was unusual. We make chili with turkey, we even make it with whiskey, but I have never, ever, seen a Chili served with a side of Tumbleweeds. Cris, you might be onto something  here—you should start your own Chili business, and I think it would be successful.

As fascinating as they may seem to those that do not live in the Southwest, tumbleweeds are a nuisance. A very big one.  When the winds blow strong, tumbleweeds accumulate in backyards, create hazards on highways, and when you try to remove them they are as sharp as barbed wire and just as fun to handle, even with heavy gloves. And they are huge. They can literally bury your backyard and get stuck under your car. Take a look  here  and  here . 

But as the American way is to overcome hurdles and turn them into opportunities, look what this woman did.   And  this is what ultimately made me pick Cristian’s recipe; it seems to me that his idea of turning tumbleweeds into something edible—and much more pleasant than the actual thing—was absolutely in line with the American spirit of innovation and enterprise.

So, congratulations Cris! Your turn now!!

Traduzione Italiana

Cristian, col suo  Chili con carne di tacchino con contorno di “salsola”, tortilla e fagioli!!!!

Come sempre, l’MTC Challenge e’ stata bellissima. Ma stavolta, io ho potuto stare dietro le quinte—il che non ha prezzo.  Sono stata felicissima di scegliere la ricetta questa volta, e mi e’ piaciuta ogni singola proposta. Tutte, nessuna esclusa. Il che ha reso molto, molto, molto difficile scegliere un vincitore. Lasciatemelo dire ancora una volta: non e’ stato facile. Percio’, prima di spiegare le motivazioni della scelta, vorrei menzionare almeno alcune tra tutte le proposte che mi sono piaciute.

In generale, mi e’ piaciuto vedere il  Chili reinterpretato in posti cosi’ lontani dal Texas e fatto con ingredienti legati   a specifiche zone, come razze locali di mucche o varieta’ di fagioli—come quelli di Cristina, Elisa, Ilaria, Sabrina, Claudia,  and Simonetta. Ma c’erano anche belle versioni fatte con la selvaggina, come quelle di Mapi Valeria e Arianna . Ce n’era perfino una fatta di  finto bisonte!

Alcuni hanno fatto splendide versioni vegetariane o—gasp!—vegan, come  Chiarina,  Spinarosa, Elena, e Giulia.  

Un ostacolo oggettivo per quasi tutti e’ stato trovare del peperoncino adatto per la ricetta. Ostacolo superato con grande perseveranza:  Andrea per esempio.  Alcuni si sono dimenticati del contorno e hanno rifatto il Chili, come Fabiola. Altri hanno inventato interessanti variazioni, che vorrei provare, come il  Chili di Trippa di Vittoria.  Vorrei provarlo, senonche’ ogni volta che propongo trippa, o fegato, per cena, la famiglia intera mi fissa con in faccia l’espressione orripilata di chi si e’ appena accorto che la propria moglie/madre e’ stata sostituita da Hannibal Lecter.

Ho particolarmente apprezzato leggere come le famiglie di ciascuno abbiano partecipato alla sfida sul  Chili:  sia che abbia aiutato a convincere i  bambini a consumare piu’ proteine,  richiesto  l’esperienza paterna nello scegliere il giusto taglio di carne, or  riconciliato una moglie con la passione del marito per il Western.  Alcuni hanno fatto delle escursioni in MexicoSpagnaGiappone, altri hanno preso una deviazione e dal Texas sono arrivati in  New Mexico. Tutti hanno fatto tortillas—e variazioni—degne di un professionista.

Sono poi ancora incredula—e scossa—per il fatto che alcuni hanno preparato il Chili  con grande rischio personale per la salute.

Alcuni hanno  espresso  il proprio scetticismo—scommetto condiviso da molti—per una ricetta cosi’ semplice, di soli 2 ingredienti. Ho apprezzato l’onesta’ e il coraggio nell’averla eseguita lo stesso, sebbene io per prima creda che quando un perfetto estraneo ti dice “Fidati di me”  l’unica cosa ragionevole da fare sia indietreggiare lentamente e poi darsela a gambe in direzione opposta.

Mi ha commosso ciascun ricordo e storia che sono stati condivisi, e soprattutto sono stata curiosa di vedere l’America con gli  occhi di chi ne e’ lontano e ha potuto vederla solo attraverso film, letteratura o brevi viaggi per vacanza o lavoro. Sia che io abbia menzionato la vostra ricetta qui o meno, vi assicuro che le ho lette tutte piu’ volte, e in ognuna ho trovato qualcosa di speciale e significativo.

Grazie a tutti!!! E un grosso abbraccio ad Ale e Dani

E adesso, ecco perche’ alla fine ho scelto la ricetta di Cristian. Non e’ stato tanto per il whisky,  che ha aggiunto insieme alla pasta di peperoncini, ne’ per la carne di tacchino cotta perfettamente. Quello che mi e’ piaciuto di piu’ e’ stata l’idea di creare una forma edibile di salsola.  Ecco.  Una cosa ingegnosa, divertente, insolita. Facciamo il Chili col tacchino, a volte lo facciamo col whisky, ma non ho mai, mai finora visto  un Chili servito con contorno di salsola. Cris, credo che tu abbia scoperto qualcosa di valido, dovresti aprire un tuo Chili Business—credo che avrebbe successo.

Per quanto che non vive nel Southwest possa trovarle  affascinanti, le Salsole sono un problema. E un grosso fastidio. I venti forti le fanno accumulare nei giardini, sono un pericolo per il traffico, e quando si cerca di rimuoverle, sono come il filo spinato e altrettanto divertenti da maneggiare, anche con i guanti spessi. Sono cosi’ grosse e numerose che strutture come un garage ne sono seppelliti, e si incastrano sotto le macchine. Date un’occhiata qui  qui . 

Ma dato che il modo di agire Americano prevede di trasformare gli ostacoli in opportunita’, guardate cosa ha fatto  questa signora.   E questo e’ quello che alla fine mi ha fatto scegliere senza dubbi la ricetta di Cristian: mi sembra che la sua idea di trasformare le Salsole in qualcosa di commestibile—e molto piu’ piacevole di quelle reali—fosse assolutamente in linea con lo spirito Americano di innovazione ed intraprendenza.

Quindi, congratulazioni Cristian!! Adesso tocca a te!!

Chili Con Carne (April MTC)

chili3
La gioia di aver vinto lo scorso MTC e’ stata duplice; da una parte ovviamente per aver visto la mia versione scelta (e realizzata!) da Mai, che ringrazio ancora. Ma la seconda ragione e’ stata per l’opportunita’ di condividere poi una ricetta che e’ il piatto-simbolo del grande (e mio amatissimo) Stato del Texas.  Avendoci vissuto per un po’ da giovane, non me n’e’ mai passata la nostalgia. Ne adoro tutto, gli abitanti, l’accento, i fantasmi, i rodei, la storia, la cultura, la musica country, e quegli spazi sconfinati, sovrastati da cieli indescrivibilmente belli, punteggiati di notte da un numero incredibile di stelle. La prateria dove per miglia e miglia non c’e’ altro che terra e cielo che si incontrano in un orizzonte che non si raggiunge mai. Ed e’ in quegli spazi che ho compreso cosa significhi essere liberi, una liberta’ che si respira, si sente, diviene tangibile come non mi e’ mai capitato in nessun altro posto.

L’origine piu’ accreditata del Chili con Carne lo fa risalire alla meta’ del 1800, in quanto cibo nutriente e facilmente trasportabile per i cowboys e gli avventurieri che attraversavano il Texas per unirsi alla corsa all’oro in California.  Inizialmente si usava carne bovina secca , peperoncini essicati, che venivano cotti a lungo sui fuochi dei bivacchi insieme ad acqua, sale e grasso bovino (suet).  Potrebbe essere stato ispirato dal pemmicam, cioe’ carne di selvaggina (bisonte, daino o alce) che i Nativi Americani essiccavano, per poi ridurla quasi in polvere pestandola con apposite pietre e infine mescolavano con grasso animale sciolto. Il pemmicam era trasportabile durante i lunghi spostamenti o veniva conservato per i periodi in cui le risorse alimentari sarebbero state piu’ scarse.  Un’altra teoria reclamata da alcuni e’ che sia invece un piatto nato nelle cucine del sistema penitenziario Texano. Ma e’ una posizione minoritaria, e personalmte preferisco la prima. Infine, potrebbe essere arrivato tramite le “Chili Queens”, le regine del Chili che lo vendevano da carretti ambulanti sulla Piazza Militare di San Antonio.  Divenne estremamente popolare durante la Depressione per diventare tuttora un piatto amatissimo in tutta l’Unione, con versioni locali particolari come quella di Cincinnati, che viene servita con gli spaghetti.
Quello che e’ certo e’ che, pur avendo influenze Spagnole e Messicane, non venne importato da quei paesi ma origino’ in Texas, dove viene affettuosamente chiamato bowl o’red (tradotto letteralmente e pedestremente: una ciotola di rosso).  Il Chili con Carne in Texas viene preso sul serio, con diatribe fierissime su quali ingredienti debbano esserci e ancora di piu’ su quali non debbano esserci. Creare una ricetta di Chili e’ un’arte per la quale si svolgono competizioni annuali, come quelle di Terlingua, qui e qui.

Per l’MTC, propongo  quindi la ricetta “ortodossa” ed essenziale del Chili con Carne, vale a dire senza  pomodoro, fagioli, mais, o altre spezie all’infuori dei peperoncini stessi. Infatti, contiene solo gli stessi ingredienti che conteneva quando veniva preparato dai cowboys che guidavano le mandrie nella prateria, senonche’ la carne bovina e’ quella fresca e non secca. Quello che e’ importante in questa ricetta e’ il modo di utilizare i peperoncini secchi, che non dovrebbero essere in polvere ma interi. Ne esistono moltissime varieta’, dai piu’ blandi ai piu’ feroci, e ognuno li sceglie in base al gusto e alla disponibilita’ quali inserire di volta in volta, creando personali miscele. Per inciso, questo modo di preparare la salsa per il Chili con Carne  e’ identico a quello che in New Mexico chiamano Chile Colorado (letteralmente, peperoncino rosso), solo che nella ricetta del New Mexico si usa il maiale e non il bovino.
Il taglio bovino da usare nel Chili e’ chiamato Chuck (credo ma non sono certa che in italiano si chiami spalla?), comunque il link indica in giallo nella figura del bovino di quale parte si tratti. E’ una parte che non si presta alle cotture brevi, non essendo tenera. Ma e’ adattissima alle lunghe cotture lente, perche’ non e’ troppo magra e al calore dolce e prolungato produce una salsa quasi gelatinosa senza bisogno di addensanti come gli amidi.  La carne deve essere a pezzi e non tritata (il macellaio la prepara a cubi di circa 2,5 cm di lato). Il tritato e’ una scorciatoia perche’ la macinatura rende la carne piu’ tenera e richiede una cottura relativament epiu’ vbreve.
I peperoncini secchi non devono essere “incartapecoriti” (perdonatemi il termine ma non me ne viene in mente uno migliore e col fuso orario dove sono non ho mica piu’ molto tempo prima che in Italia sia ora di pubblicare), ma ancora pliabili, come i pomodori secchi, per capirci. Quelli in polvere sono da evitare perche’ non si reidratano bene e l’effetto finale e’ quello del terriccio sotto i denti.

Chili Con Carne

1, 5 kg di manzo (spalla) tagliato a cubi di 2,5 cm di lato

peperoncini secchi interi (io avevo a disposizione 7  Chile Negro (Pasilla) e  2 Chile Ancho (Poblano), che sono pochissimo pochissimo piccanti, ma hanno toni quasi fruttati, molto profumati. La quantita’ da usare dipende dal tipo e dall’intensita’, appunto.

sale

chile1

Spezzettate i peperoncini secchi scuotendone fuori i semi (da eliminare) e mettete i pezzi in una ciotola, coprite i peperoncini di acqua bollente e lasciate in infusione per almeno 2 ore.

chile3

Passato questo tempo, frullateli con l’acqua di infusione fino ad ottenere una pasta leggermente densa. Passatela da un setaccio fine  in modo da eliminare ogni residuo di pellicine, recuperando quanta piu’ polpa possibile.
Mettete la carne e la salsa in una pentola di ghisa, coccio o acciaio pesante, regolate di sale mescolate bene e fate cuocere coperto (lasciate una piccolissima fessura perche’ possa uscire il vapore) a calore dolcissimo per circa 3 ore, controllando ogni tanto. Non e’ necessario far rosolare la carne perche’ il calore forte che sarebbe necessario ne irrigidisce le fibre, rendendola poi piu’ dura da cuocere.  Si puo’ anche mettere a cuocere in forno a circa 120C, per una cottura lenta e uniforme, col calore che circonda la pentola interamente.
L’ideale e’ far riposare il Chili e servirlo il giorno dopo.

Se si usano i peperoncini freschi, questi vanno prima abbrustoliti in forno, fatti riposare in un sacchetto di carta o avvolti in un foglio di alluminio, spellati, eliminando i semi, e utilizzati tritati piu’ o meno sottilmente per preparare il chili.  Attenzione ad aerare bene l’ambiente quando si arrostiscono i peperoncini piccanti specie se sono del tipo forte, meglio utilizzare i guanti di gomma per spellarli e eliminare i semi e fare attenzione a non toccarsi la pelle o gli occhi!

per accompagnare il Chili

Tortillas di farina di grano

500 g di farina a basso contenuto di glutine

3 cucchiai di grasso a scelta (lardo, ma oggi si usa soprattutto olio vegetale o grassi vegetali idrogenati) io uso olio vegetale

1-1/2 cucchiaini di baking powder (lievito chimico non vanigliato)

1 cucchiaino di sale

240-360 ml di acqua tiepida

si lavora il grasso nella farina mescolata con lievito e sale con la punta delle dita fino a intriderla tutta, poi si aggiunge acqua sufficiente ad avere un impasto morbido ma non attaccaticcio. Deve essere ben idratato o le tortillas si sbriciolano quando si stendono col mattarello, ma non va lavorato troppo o si sviluppa il glutine e restano dure. Ci vuole un po’ di pratica. (io ho una piccola aiutante molto entusiasta).

tortillas1

Si creano con l’impasto delle palline poco piu’ grandi di una noce e si fanno riposare 10-15 minuti sotto un telo umido. Nel frattempo si fa scaldare una padella o piastra di ghisa o ferro o acciaio (non teflon che non si puo’ scaldare vuoto) e quando e’ ben calda si prende una pallina e col mattarello si schiaccia fino a formare una cerchio piu’ o meno sottile, a seconda di come si preferscano le tortillas. Se si mette la pallina di pasta in una busta di plastica per alimenti e’ piu’ semplice da stendere.

tortillas2

tortillas3

tortillas 4

La piastra e’ calda a sufficienza quando spruzzandola con qualche goccia d’acqua questa sfrigola ed evapora quasi istantaneamente. Si mette la tortilla a cuocere da un lato e appena si vedono formare delle bolle in superficie si alza un po’ con la spatola per controllare che sotto ci siano delle macchie brune, a quel punto si gira e si fa finire di cuocere anche l’altro lato. Ogni tortilla una volta pronta va tenuta in caldo in un paniere rivestito con un telo abbastanza ampio d apoter coprire la pila di tortillas in modo da tenerle calde.

per entrare nello spirito del tema, vi lascio con alcune canzoni country tra le mie preferite

Waylon Jennings – You’ll Never Take Texas Out Of Me

Waylon Jennings – Luckenback, Texas

Toby Keith – Should’ve Been A Cowboy

Gary P Nunn- Terlingua Sky

My Heroes Have Always Been Cowboys

Waylon Jennings – Mamas Dont let Your Babies Grow up to be Cowboys

OK, Good Luck Everybody!!

Kosher Fideuà with Agristada

fideua3

8188031461_122967891a_o

Traduzione italiana in fondo

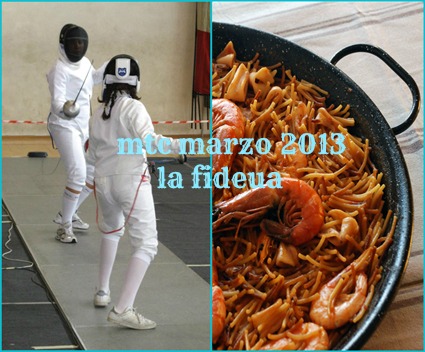
Mai, who won the MTC last month, chose Fideuà a dish from her homeland (Valencia) for us to make this time. By the way, this is the fifth challenge I participate in since my joining the MTC team. Which means I am midway to completing the required 8-challenges minimum expected of all participants. I am really glad to be part of this. I was welcomed so warmly in the group, and they are all so talented both in front of the stove and behind the camera that I always wonder how can I be a member. But they are also very nice people and make you feel like you belong and that they are actually happy that you do.
I have never had or even known about this dish, but the name was strangely familiar. As it turns out, it consists of a mix of fish and shellfish and thin pasta strands called fideos, similar to vermicelli or angel hair, cooked together in a fish stock, saffron, and tomato base. The final dish is served with a garlicky sauce on the side.
The name was familiar to me, indeed, because it is almost the same as a very old Sephardi dish, fideos tostados, a much simpler—and kosher—version made only with pasta, onions, and tomatoes. The technique is the same, in fact—the pasta is first toasted in a little olive oil and then cooked in just enough liquid so that the final result is not soupy at all.  My Italian friends will probably cringe knowing that we do not cook our fideos al dente, but just a little softer, even if not mushy. The Sephardic fideyos predate the discovery of America and at first did not contain tomatoes; sometimes they were served dressed with olive oil and lemon juice, or cheese, or added to soups and stews, especially for Shabbat.  The relatively more recent tomato-y version  has become the most popular, despite being so simple and homey. It is traditionally served at the meal preceding the fast of Yom Kippur.

In fact,  this particular dish for the  MT Challenge reminded me of my grandma’s fideos, which she would cook for me every time I visited, as it was my absolute favorite. Even now, that is a dish that to me is truly comfort food, as it evokes affection, care, and family ties that are stronger than time and distance.
But it also evoked memories of family lore, so far away in time and space to become almost legend—at least in my eyes. My great-great-grandmother Anna descended from a Sephardi family that left Spain following the Jewish Expulsion in 1492.  They were from Gerona, in Catalonia, where once a great Jewish community flourished and produced an important Kabbalistic school.
I have, of course, never met her, but her (only) daughter, my great-grandmother, used to say I looked a lot like her, and after her I was named.

So, in honor of my great-great-grandma Anna, I decided that I would make a kosher version of this dish, and use ingredients that somehow relate to the Sephardi heritage.  I chose chickpeas, sweet peppers, and fresh cod. I know Mai requested that we use simple foods that would be available on a fishing boat, and I wondered whether bell peppers would qualify. Then it occurred to me that if fresh tomatoes were actually required, then fresh peppers might as well be OK.
The original recipe also includes garlic, both in the pasta and in the accompanying sauce. That was impossible for me, since garlic makes me very, very ill for many days if I eat  some—not that I ever want to.  My family likes it though, and since it is in general a very healthy food, I normally prepare garlicky dishes just for them. But this time I wanted us all  to share the same dish, and used only onions.  For the accompanying sauce, I had no hesitations; it would be Agristada. It is a very old Sephardi  recipe that originally was made with agresto, or sour grapes juice. As that ingredient was not always easily available, it was replaced by fresh lemon juice in Medieval times.  The sauce can be made with fish, vegetable or meat stock, or even just with water, depending on the nature of the food it will be used with. Most often, it is paired with fried fish, but for Passover it is also eaten with boiled artichokes.  The Italkim (Italian Jews) know it as Bagna Brusca, and use it to dress tagliatelle to eat cold for Shabbat. Greek avgolemono is similar but soupier. Agristada can be served warm or cold. Sometimes, a little extra-virgin olive oil is added to it, and served cold is similar to mayo–minus the potential issues associated to consuming raw eggs).
For the fish stock, I used a prepackaged mix of fish parts that my local kosher fishmonger offers just for that purpose. Fresh cod fillets were my  fish of choice, since I did not want to use freshwater fish this time.  It is imperative to use dried chickpeas, as their cooking liquid is used to complement the fish stock. Besides, canned chickpeas are too mushy to begin with and would  disintegrate in the final dish. I did not use any spices but a couple of bay leaves for the chickpeas.

Fish Stock

2 lb kosher fish parts (heads and bones)

10 cups water (or as needed)

1 onion

1 carrot

1 stalk celery

1 bunch of parsley

10 grains of pepper

1 tbsp kosher salt

Place the fish parts and the vegetables (washed and sliced) together with the parsley, pepper, and salt in a large pot. Add water just to cover, bring to a boil, then simmer for about 30 minutes. Strain.

Chickpeas

1 lb dried chickpeas (soaked overnight in cold water, then drained and rinsed)

1 fresh tomato

2 bay leaves

1 onion

salt

Slice the onion, peel the tomato, eliminating the seeds, and dice finely. Place the soaked chickpeas and the prepared vegetables in a pot  and add enough cold water to cover everything by  2 inches. Bring to a boil, then simmer,covered, until the chickpeas are tender, adding salt to taste towards the end of the cooking time. You will have a lot of chickpeas, more than you need for this dish, but they can be frozen with some of their liquid).

Agristada Sauce

1 cup fish stock (strained)

2 large eggs

1/2 tbsp cornstarch

1/3 cup freshly squeezed lemon juice

salt to taste

Put all ingredients in a blender and mix briefly (or place everything in a pan and blend with an immersion blender).  Cook on medium heat, stirring constantly for about 3 minutes, until thickened. Do not boil. Taste and add more salt if needed.  Keep covered in a glass container and serve warm or cold (refrigerate any leftovers promptly).

Fideuà

1 lb fideos or spaghetti, broken into 1-inch.  pieces

2 fresh tomatoes, peeled and finely diced

1 onion, finely diced

1 lb wild Alaskan cod fillets cut in 2 x 2 -inch pieces

3 bell peppers (1 green, 1 yellow, 1 red), cut in strips

2 cups of cooked chickpeas, drained (save the liquid!)

fish stock (strained)  as needed

chickpeas cooking liquid (strained) as needed

salt to taste

extra-virgin olive oil

Heat 2 tbsp olive in a large cast-iron pan and lightly toast the pasta, stirring,  taking care not to burn it. Put the pasta on a platter and in the same pan add 1 more tbsp olive oil, then briefly cook the fish, just until it begins to flake. Place the cooked fish in a covered container to keep it warm. Add the onion to the pan and saute  until soft and transparent, then add the tomatoes and peppers, sauteing until the peppers are soft and the tomatoes begin to turn jammy. Add salt to taste and add a few tbsp of fish stock. Finally, add some fish stock and some chickpeas cooking liquid, enough to cover the fideos once they are returned to the pan. As soon as the liquid begins to boil, add the toasted fideos and cook, stirring, for half the pasta’s required cooking time—my fideos cooked for a total of 10 minutes. At that point add the cooked fish and  chickpeas and continue cooking, stirring, until the pasta is ready. (You might need to add a little more cooking liquid to cook the pasta, but careful not to turn it into a soup).

Fideua main

The Agristada paired extremely well with this dish, its tangy and refreshing taste truly complemented the fish and vegetables that dressed the pasta. This was the last pasta and legumes I cooked before preparing the house for Passover, which requires eliminating all sources of Chametz. We all enjoyed it and it will likely become part of our routine, because it makes for a very tasty and nutritious one-pot meal.

Thank you Mai for this recipe, and thank you Ale, Dani and Giorgia for MTC!!!

Traduzione italiana

Mai, che ha vinto l’MTC del mese scorso, ha proposto la Fideuà, un piatto della sua terra d’origine (Valencia) per la sfida di questo mese. A proposito, questa è la quinta sfida a cui partecipo da quando sono entrata a far parte dell’MTC. Il che significa che sono a metà strada per completare il numero minimo di otto sfide come da regolamento. Sono davvero felice di farne parte. Sono stata accolta così calorosamente nel gruppo, in cui tutti hanno un grande talento sia in cucina che con la macchina fotograficache mi chiedo sempre come faccia io a farne parte. Ma sono anche persone molto gentili e ti fanno sentire  che gli fa anche piacere che tu faccia parte del gruppo.
Non avevo mai saputo (o assaggiato) di questo piatto, ma il nome mi era stranamente familiare. Come ho visto, si tratta  di pesci e frutti di mare con un tipo di pasta chiamata fideos, simile ai vermicelli o capellini, cotti insieme in un brodo di pesce, zafferano, e pomodoro. Il piatto finale è servito con una salsa all’ aglio.
Il nome mi era familiare, certo, perché è quasi lo stesso di un piatto molto antico degli Ebrei Sefarditi, chiamato fideos tostados, molto più semplice e kosher, fatta solo con la stessa pasta, cipolle e pomodori. La tecnica è uguale, infatti, la pasta viene prima tostata in poco olio e poi cotta in liquido
appena sufficiente da ottenere alla fine un piatto asciutto, non brodoso. I miei amici italiani probabilmente rabbrividiranno nel sapere che non cuciniamo i nostri fideos al dente, ma un po’ oltre. I  fideyos sefarditi sono anteriori alla scoperta dell’America e in un primo momento non contenevano pomodori, a volte erano serviti conditi con olio d’oliva e succo di limone, o formaggio, o aggiunti a zuppe e stufati, soprattutto per lo Shabbat. La versione relativamente piu’ recente col pomodoro comunque è diventata la più popolare, nonostante sia un piatto molto semplice, da famiglia. E’ servito tradizionalmente per il pasto che precede il digiuno di Yom Kippur.

In realtà, questo piatto particolare per la sfida di MT mi ha ricordato i fideos tostados di mia nonna, che lei cucinava per me ogni volta che andavo a trovarla, essendo il mio preferito in assoluto. Oggi piu’ di allora, per me è veramente un cibo consolatorio, in quanto evoca l’affetto, la cura, e i legami familiari che sono più forti del tempo e della distanza.
Ma ha anche evocato ricordi della mia tradizione familiare, così lontano nel tempo e nello spazio dar diventare quasi leggenda — almeno ai miei occhi. La mia bis-bis-nonna Anna discendeva da una famiglia sefardita che  abbandono’ la Spagna dopo l‘editto di espulsione ebraica nel 1492. Erano originari proprio di Gerona, in Catalogna, dove un tempo
fiorì una grande comunità ebraica che diede vita ad una importante scuola cabbalistica.
Ovviamente, non ho mai conosciuto la mia bis-bis-nonna, ma la sua (unica) figlia, la mia bisnonna, diceva che le assomigliavo moltissimo, e porto il suo nome.

Così, in onore della mia bis-bis-nonna Anna, ho deciso che avrei fatto una versione kosher di questo piatto, utilizzando ingredienti che in qualche modo si riferiscono al patrimonio culinario sefardita. Ho scelto ceci, peperoni e merluzzo fresco.  Mai ha richiesto che usassimo ingrededienti semplici, che potrebbero essere facilmente disponibili nella cambusa di un peschereccio, e mi chiedevo se i peperoni freschi fossero accettabili. Poi mi e’ venuto in mente che, se i pomodori freschi erano necessari, i peperoni freschi dovevano andare altrettanto bene.
La ricetta originale comprende anche aglio, sia nella pasta che nella salsa di accompagnamento. Era impossibile per me, dal momento che l’aglio mi fa stare molto, molto male per molti giorni se ne mangio anche solo un po’ —non  che ne abbia mai il desiderio. Alla mia famiglia piace, però, e dato che è, in generale, un alimento molto sano, io di solito preparo piatti con aglio solo per loro. Ma questa volta ho voluto che tutti noi  condividessimo lo stesso piatto, e ho utilizzato soltanto cipolle. Per la salsa di accompagnamento, non ho avuto esitazioni, sarebbe stata l’ Agristada. E ‘una ricetta molto antica sefardita che originariamente era fatta con l’ agresto, o  succo d’uva acerba. Poiché tale ingrediente non era sempre facilmente disponibile, fu sostituito da succo di limone fresco in epoca medioevale. La salsa può essere fatta con brodo di pesce, vegetale o di carne, o anche solo con acqua, a seconda del cibo che dovra’ accompagnare. Il più delle volte, si serve con pesce fritto, ma per la Pasqua ebraica è anche mangiata con carciofi bolliti. Gli Italkim (ebrei italiani) la conoscono come Bagna Brusca, e la usano per condire le tagliatelle da mangiare fredde per lo Shabbat. L’ Avgolemono greco è simile ma piu’ liquido. L’ Agristada può essere servita calda o fredda. A volte, se e’ servita fredda viene preparata con l’aggiunta di un po’ di olio extra-vergine di oliva, e il risultato finale e’ simile alla maionese (ma eliminando il problema dell’uovo crudo).

Per il brodo di pesce, io ho usato un mix preconfezionato di parti di pesce che il mio pescivendolo kosher locale offre prprio per questo scopo. I filetti di merluzzo freschi sono stati la mia scelta, dal momento che non volevo usare pesci d’acqua dolce questa volta. E ‘indispensabile utilizzare ceci secchi, siccome il loro liquido di cottura viene utilizzato per integrare il brodo di pesce. Inoltre, i ceci in scatola sono troppo morbidi per cominciare e si sarebbero disintegrati nel piatto finale. Non ho usato le spezie, ma un paio di foglie di alloro per i ceci.

Fumetto di Pesce

1 kg di parti di pesce kosher  (teste e lische)

2,5 l dii acqua (o secondo necessità)

1 cipolla

1 carota

1 gambo di sedano

1 mazzetto di prezzemolo

10 grani di pepe

1 cucchiaio di sale kosher

Mettere i pezzi di pesce e le verdure (lavate e affettate) insieme con il prezzemolo, il pepe e il sale in una grossa pentola. Aggiungere acqua solo per coprire, portare a ebollizione, poi cuocere a fuoco lento per circa 30 minuti. Passare il brodo dal setaccio quando e’ pronto.

Ceci

500 g di ceci secchi (ammollati durante la notte in acqua fredda, poi scolati e sciacquati)

1 pomodoro fresco

2 foglie di alloro

1 cipolla

sale

Affettare la cipolla, pelare il pomodoro, eliminare i semi e tagliare a dadini. Mettere i ceci ammollati e le verdure preparate in una pentola e aggiungere acqua fredda sufficiente a coprire tutto circa di 5 cm.  Portare a ebollizione, poi cuocere a fuoco lento, coperto, fino a quando i ceci sono teneri, aggiungendo sale a piacere, verso la fine del tempo di cottura. Avrete un sacco di ceci, più di quello che serve per questo piatto, ma possono essere congelati con un po ‘del loro liquido).

Salsa Agristada

1 tazza di brodo di pesce (passato dal colino)

2 uova grandi

1/2 cucchiaio di amido di mais

80 ml  di succo di limone appena spremuto

sale qb

Mettere tutti gli ingredienti in un frullatore e mescolare brevemente (o porre tutto in un tegame e frullare con un frullatore ad immersione). Fate cuocere a fuoco medio, mescolando continuamente per circa 3 minuti, fino a che e’ addensato. Non bollire. Assaggiare e aggiungere sale (deve essere saporita). Tenere coperta in un contenitore di vetro e servire tiepida o fredda (conservarla tempestivamente in frigorifero se avanza).

Fideuà

500 g fideos o spaghetti, spezzati in sezioni di 2-3 cm di lunghezza

2 pomodori freschi, pelati e tagliata a cubetti

1 cipolla, tagliata a cubetti

500 g filetti di merluzzo dell’Alaska  tagliati in pezzi di 5 cm di lato

3 peperoni (1 verde, 1 giallo, 1 rosso), tagliati a strisce

2 tazze di ceci cotti, scolati (salvare il liquido!)

brodo di pesce (passato al colino) quanto basta

ceci liquido di cottura (passato al colino), q.b.

sale q.b.

olio extravergine di oliva

Scaldare 2 cucchiai di olio d’oliva in una grande padella di ghisa e tostare leggermente la pasta, mescolando, facendo attenzione a non bruciarla. Mettere la pasta su un piatto e nella stessa padella aggiungere 1 cucchiaio di olio d’oliva di più, poi brevemente cuocere il pesce, solo fino a quando non inizia a sfaldarsi. Mettere il pesce cotto in un recipiente coperto per mantenerlo caldo. Aggiungere la cipolla nella padella e far soffriggere fino a che e’ morbida e trasparente, quindi aggiungere i pomodori e peperoni, rosolare fino a quando i peperoni sono morbidi e i pomodori cominciano a sciogliersi. Aggiustare di sale e aggiungere un cucchiaio di brodo di pesce. Infine, aggiungere abbastanza di brodo di pesce e di liquido di cottura dei ceci, sufficiente a coprire i fideos una volta che vengono rimessi in padella. Non appena il liquido inizia a bollire, aggiungere i fideos tostati e farli cuocere, mescolando, per metà del tempo di cottura richiesto della pasta — imiei fideos richiedevano un totale di 10 minuti. A questo punto aggiungere il pesce cotto e i ceci e continuare la cottura, mescolando, fino a quando la pasta è pronta. (Potrebbe essere necessario aggiungere liquido di cottura in più per cuocere la pasta, ma attenzione a non trasformarlo in una zuppa).

Fideua main
L’ Agristada si abbina davvero molto bene con questo piatto, il suo sapore agro e fresco mette in evidenza i sapori del pesce e delle verdure che condiscono la pasta. Questa è stata l’ultima pasta e legumi che ho cucinato prima di preparare la casa per la Pasqua, che richiede l’eliminazione di tutte le fonti di chametz. E’ piaciuta moltissimo a tutti e sarà probabilmente  parte della nostra routine, perché e’ un piatto unico molto gustoso e versatile.

Grazie Mai per questa ricetta, e grazie Ale, Dani e Giorgia per MTC!

(Not So) Blue Velvet Cake

100_8490

Traduzione in Italiano in fondo

Stefania, the most recent winner of MTC ,  picked a gluten-free version of Red Velvet Cake for the February MT Challenge.  I was particularly happy with her choice, because no one in my immediate family and circle of friends has Celiac disease, so I never had the opportunity to learn what must be done to make gluten-free baked goods. But she made a very interesting parallel between cooking gluten-free foods and Kosher cooking. That is something I certainly can relate to, since my own kitchen is kosher. Making sure there is no cross-contamination, keeping utensils separate, are all actions that become second-nature when cooking kosher food, and the same applies when cooking gluten-free foods. I live in the US so I have no problem finding gluten-free ingredients that are clearly labeled, and most supermarkets even offer a whole aisle of gluten-free ingredients. So all the ingredients I used were gluten-free and I had no trouble finding them.

The second reason I was happy about Stefania’s choice is that she picked an American classic recipe, and for once I was baking on my own turf, so to speak.  The rules of the game allowed participants to use either red or blue food coloring, and I chose the latter. I did not want to make the usual frosting that goes with classic red Velvet and since I could not bring myself to detract from tradition, I chose blue as a color in order to avoid any qualms in changing the recipe substantially. As you can see from the photo above, the final result was more of a greyish color than the bright, deep blue I had envisioned. Sadly, not everything turns out quite as we expect, in this Valley of Tears.  In the words of my eldest son, this cake, at least visually, is a an epic fail.
Taste-wise though, it is quite a different story.  The cake is light, moist and springy and the frosting I used was an indisputable success—if I can say so myself. It is a simple whipped cream sweetened with grade-B 100% pure maple syrup,  and the combination is extremely tasty. I added dried cranberries as a decoration on top.

I followed Stefania’s recipe for the cake, using corn-starch instead  of tapioca, as the rules stated it was possible to substitute one for the other.  The frosting was simply made by whipping together

1 qt of Heavy Whipping Cream

6 tbsp pure Maple Syrup, grade B.

I enjoyed participating in this Challenge because it gave me the opportunity to learn more about Celiac disease and what it implies in terms of everyday life adjustments and limitations. But, as Stefania pointed out and was eager to get across, despite these limitations it is possible to make good food that would be enjoyable by everybody—provided we get educated about how to get this done.  I appreciated the positive attitude of Stefania’s message— rather than depicting people that deal with celiac disease on a daily basis in a helpless perspective she chose a constructive approach and that is something that resonates with me deeply.

In keeping with the lighthearted, positive attitude of the challenge, Stefania also requested that participants should wear pumps  
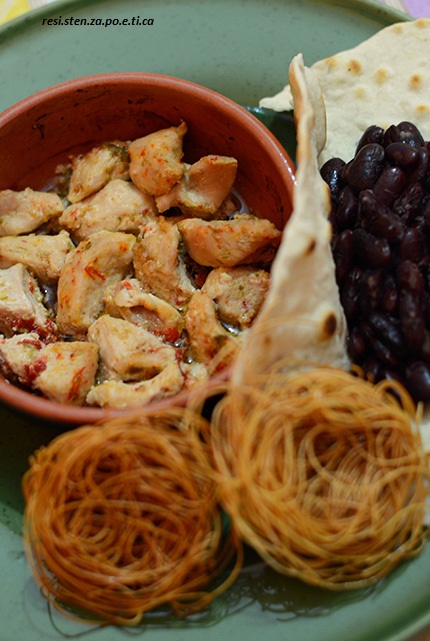
with 4-3/4″  heels while baking this cake. I am sorry I could not comply.

We had tons and tons and tons of snow where I live, which is so nice when you wake up in the morning and  looking out the window all you see is a Winter Wonderland just like this everyday.

winter

But since nothing in this world comes for free, the downside of this beauty is that you have to go outside and shovel snow until you wish you could just close your eyes, stomp your feet on the (icy) ground, shout “I’m Cold!!!” and be immediately transported to a warmer place—preferably Florida. And if shovel you must, then you are also bound to get sore muscles and a backache, especially if you are not so young anymore, like me.  And all of this means that I could not possibly even think of wearing high heels. In fact, the only girl in my family that can wear pumps all day long and never loose her smile is BarbieTM. But, as BarbieTMsays, “everything’s fantastic when you’re made of plastic !”.

Thank you Stefania, and,  as always, Thank you Ale, Daniela, & Giorgia.

Versione Italiana

Stefania, la vincitrice della scorsa edizione di MT Challenge ha proposto per la sfida di febbraio una versione gluten-free di Red Velvet Cake. La scelta mi ha fatto particolarmente felice perche’ nessuno nella mia famiglia o tra le mie amicizie e’ celiaco, e non avevo mai avuto l’opportunita’ di imparare cosa comporti cucinare gluten-free. Stefania ha pero’ fatto un interessante parallelo tra la cucina gluten-free e quella Kosher, e in questo posso riconoscermi, dato che la mia e’ una cucina Kosher.  Assicurarsi che non si abbiano contaminazioni, mantenere gli utensili separati, sono tutte azioni che diventano abitudini consolidate sia nel cucinare kosher che nella cucina gluten-free.  Vivendo negli Stati Uniti non ho problemi nel reperire ingredienti per celiaci, la scelta e’ ampia, le etichette chiare e la maggiorparte dei supermarkets dedica un intero reparto a questi prodotti. Tutti i prodotti che ho usato erano etichettati gluten-free.

La seconda ragione per cui la scelta mi ha resa felice e’ che si tratta di una ricetta classica Americana, per cui questa volta mi trovo a giocare in casa, per cosi’ dire. Le regole del gioco permettevano di scegliere un colorante rosso o blu. Ho scelto il secondo perche’ non avevo intenzione di usare il frosting che tradizionalmente si usa per il Red Velvet Cake, e non riuscivo a contemplare l’idea di stravolgere la tradizione. Percio’ ho optato sul blu per fare una torta per la quale sperimentare senza remore un frosting diverso. Come si vede dalla foto, il risultato finale e’ stato un grigio temporalesco, non il blu profondo e brillante che mi ero immaginata. Ma di rado, in questa Valle di Lacrime,  le cose si realizzano come si sperava. Per dirla con mio figlio maggiore, all’aspetto questa torta e’ un fallimento di proporzioni epiche.

Dal punto di vista del gusto, pero’, e’ tutta un’altra storia. La torta e’ umida, leggera e spugnosa, perfetta. E il frosting e’ stato un successo, se posso dirlo. E’ semplice panna montata, ma anziche’ con lo zucchero e’ addolcita con Sciroppo d’acero puro, e il risultato e’ gustosissimo. Ho decorato la superficie con cranberries secchi.

Per la torta ho seguito la ricetta di Stefania, sostituendo, come permesso, la tapioca con la maizena.  Per il frosting ho montato un litro di panna fresca con 6 cucchiai di sciroppo d’acero.

Mi e’ piaciuto molto partecipare a questa sfida perche’ mi ha dato l’opportunita’ di imparare qualcosa sulla celiachia e i limiti che impone nella vita quotidiana. Ma, come Stefania voleva assolutamente comunicare, malgrado queste limitazioni e’ possibile cucinare cibi buoni che possono essere gustati da tutti, a patto di acquisire le informazioni necessarie.

Ho apprezzato la prospettiva del messaggio di Stefania, che anziche’ presentare i celiaci in una visione passiva e negativa, come se non potessero che subire la malattia, ha scelto una prospettiva attiva e costruttiva, e questo e’ un atteggiamento nel quale mi riconosco profondamente.

E nello spirito anche leggero in cui la sfida si e’ quindi svolta, Stefania ha richiesto ai partecipanti di indossare un tacco 12  quando preparavano la torta. Mi dispiace di non aver potuto esaudire la richiesta.

Il fatto e’ che qui abbiamo avuto tonnellate e tonnellate e tonnellate di neve, il che’ e’ bellissimo quando ci si sveglia al mattino e dalla finestra ogni giorno si vede questo paesaggio invernale

winter

Ma siccome in questo mondo tutto ha un prezzo, l’inconveniente di tutta questa bellezza e’ che bisogna uscire fuori a spalare la neve, finche’ non si desidera nientaltro che chiudere gli occhi, battere i piedi sul terreno (gelato) , gridare “Ho freddo!!!” e poter essere immediatamente trasportati in un posto caldo, preferibilmente la Florida.  E se spalare si deve, la conseguenza, per chi come me non ha piu’ vent’anni da un pezzo,  sono i muscoli indolenziti e il mal di reni. Tutto questo per dire che non avrei neanche potuto pensare di indossare scarpe coi tacchi, specie un tacco 12. A dirla tutta, l’unica ragazza in famiglia che riesce ad indossare il tacco 12 tutto il giorno senza perdere il sorriso e’ BarbieTM.   Ma,  come dice appunto BarbieTM. “ogni cosa e’ fantastica quando sei fatta di plastica!”.

Grazie Stefania, e, come sempre, grazie Ale, Daniela e Giorgia.

American Pici

pici 2

 Traduzione in Italiano in fondo8188031461_122967891a_o

When Patty won the  MT Challenge  back in November I was happy  because I was sure she in turn  would suggest a wonderful recipe. She chose  Pici,  a Tuscan pasta that originated in the Val d’Orcia, the countryside of Siena.  Patty gave a very exhaustive and interesting  description of this earthy, rustic food and recommended that  participants should devise versions that used simple local ingredients in order to stay true to the nature of the original dish.

I have never been to Siena—in fact, it is rather unlikely I will any time soon. I never tasted pici and I certainly never made them before. So I was a little intimidated by this challenge. Even if I make fresh pasta once in a while,  I always make the egg-based kind—easily and painlessly rolled and cut with a hand-cranked pasta machine. Indeed, I was picturing several scary scenarios. First of all, I expected it would take me forever and a day to make pici by hand. The lack of eggs  in the dough evoked dark images of pasta strands tangled in a horrifying sticky mess.  I was sure I was going to overcook them into oblivion.  These were some of the nightmares that marred my nights lately.  But I finally pulled myself together, followed Patty’s recipe and instructionpici board 1s to a T and, lo and behold, it turned out pici are one of the easiest pastas I have ever made.  Once the dough and I had relaxed enough  it took just minutes to form thin strands of pasta  that never turned sticky and cooked to chewy perfection.

For my entries in previous MT Challenges  I relied on the family tradition I acquired through marriage. This time, I tapped into my own family of origin’s.  Even if this is a recipe I have pretty much created myself—my own interpretation of how this Tuscan pasta could be prepared with American ingredients, the flavors of the finished dish were  closely reminiscent of the traditional Thanksgiving meal. My understanding of Patty’s recommendation of using local ingredients has been to use some ingredients that have  significant ties with the history of New England.

I figured the sauce should be meat-based, and because Wild Turkeys are numerous here (despite the fact that so are they) dark turkey meat was the first ingredient I chose. (Disclaimer: none of the Wild Turkeys that regularly wander into our yard has been harmed in the making of this dish—I bought prepackaged  ground turkey at the supermarket).

I love to grow herbs and read about herb lore—in fact, my own maiden name is an old Gaelic word that means Yew,  a sacred tree that holds a very important place in Celtic Mythology.  So I wanted to include a culinary herb, and I chose Sage because traditionally in America that is the herb used to cook turkey.  Sage was among the herbs that the Pilgrims  brought  from England, and it is my personal favorite. Over the years I recreated a small Colonial herb garden in my own backyard with many of the herbs that the Early Colonists used, among which Parsley, Sage, Rosemary, and Thyme were especially prized for cooking, medicinal remedies, cosmetics, and of course  Love Charms. However, the latter use might land you in a lot of trouble in the early days.  I like Sage’s scent and flavor.  It was said to ward off evil and bring good luck and prosperity—but only if grown with other plants, to grant longevity or even immortality, heal the skin, darken the hair, and foster wisdom.  sage 1I am always amazed  at its resilience—even now in the dead of Winter, in the midst of a severe cold spell, my Sage plant still bears some green leaves. Finally, I have added some  cranberries, which the Natives taught the Early Settlers how to use. The dried cranberries melted in the sauce during the long and slow cooking, and paired well with the flavors of the other ingredients.

To make the Pici, I closely followed Patty’s recipe and instructions. To make the Sauce you will need:

1 lb ground Turkey thigh

1 large  Sweet Onion, finely chopped

5-10 Sage leaves (depending on their size), finely minced

1/4 cup dried Cranberries

2 tbsp Olive oil

1/2 cup Turkey Stock (or vegetable or chicken stock, preferably homemade) + extra as needed.

salt to taste

Brown the ground turkey in a preheated  cast iron Dutch oven, making sure to break any lumps. Add the onion and saute until it softens and becomes translucent. Add the sage leaves and cook, stirring, one more minute, then add the cranberries. Finally add salt and stock, cover and let cook slowly on the lowest heat until the liquid is reduced, 4-5 hours. Check regularly and add extra stock if necessary to prevent scorching.  If you own  a 3-4 qt  slow cooker, transfer the sauteed meat and vegetable mixture to the crock  and cook on low for 8 hours—you won’t need any extra stock for the slow cooker.

I made the sauce one day ahead. It freezes well.   I made the pici  for lunch on a really cold day (3 F) and it was one of the most filling and satisfying dishes one could have to ward off the cold.  Thanks Patty for teaching me this wonderful dish (I stashed the freezer with sauce jars  for future meals). And thanks to Ale, Daniela & Giorgia for hosting MT Challenge.

Bibliography

Alice Cooke Brown. Early American Herb Recipes. (1994). Dover Publications, Inc.

Edith Van Allen Murphy. Indian Uses of Native Plants. (1958). Meyerbooks.

Marie Miczak, D. Sc., Ph. D. Nature’s Weeds, Native Medicine. Native American Herbal Secrets. (1999). Lotus Press.

Italian version

La meritatissima vittoria di Patty nella scorsa edizione della MT Challenge mi aveva reso felice perche’ sapevo che avrebbe proposto a sua volta una ricetta bellissima. E infatti ha proposto i pici, una pasta tipica della sua terra, la provincia Senese. Patty raccomandava ai partecipanti di proporre una versione con ingredienti locali, per restare fedeli all’origine rustica e povera del piatto.  Non sono mai stata a Siena ed e’ improbabile che ci vada nel prossimo futuro, non avevo mai assaggiato ne’ fatto i pici prima di adesso. E per questo la ricetta mi intimidiva un po’.  Anche se a volte preparo la pasta fresca mi sono sempre limitata a quella all’uovo, spianata e tagliata col metodo indolore, cioe’ usando una macchina per la pasta a manovella. Immaginavo diversi scenari piuttosto preoccupanti. Per prima cosa, pensavo che ci avrei messo un’eternita’ a fare i pici a mano. L’assenza di uova nell’impasto evocava immagini orripilanti di rotolini di pasta inestricabilmente appiccicati tra loro. Ero sicura che li avrei stracotti fino a farli scomparire.  Questa la sostanza dei miei incubi negli ultimi tempi. Ma poi mi sono fatta coraggio, ho seguito la ricetta e il procedimento alla lettera e, sorpresa, questa e’ uno dei tipi di pasta piu’ semplici che abbia mai provato a fare. Una volta che l’impasto ed io ci siamo rilassati a sufficienza ci sono voluti pochi minuti per formare dei lunghi fili che non si sono appiccicati tra loro e sono emersi dalla cottura perfettamente al dente.pici board 1

Se nelle mie precedenti partecipazioni al MT Challenge ho attinto dalla tradizione che ho acquisito col matrimonio, stavolta ho seguito quella della mia famiglia di origine. Sebbene questa sia una ricetta inventata da me, cioe’ la mia personale interpretazione di come questo piatto italiano potesse essere fatto con ingredienti Americani, il risultato finale nei sapori ricordava il tradizionale pasto del Ringraziamento. Ho interpretato la richiesta di Patty di usare ingredienti locali utilizzando ingredienti che hanno un significativo legame con la storia del New England. Volevo preparare un condimento a base di carne, e poiche’ i Tacchini Selvatici qui sono numerosi (malgrado il fatto che siano numerosi anche loro), ho scelto il tritato di tacchino (coscia) come ingrediente principale. (Disclaimer: a nessuno dei Tacchini Selvatici che regolarmente transitano nel nostro prato e’ stato fatto del male per preparare questa ricetta; ho acquistato il tritato al supermercato).

Una cosa che amo fare e’ coltivare le erbe e studiarne il folklore. Infatti, il mio cognome da nubile e’ un antico termine Gaelico che indica l’albero del Tasso, una pianta sacra che occupa un posto molto importante nella Mitologia Celtica. Anche per  questo volevo includere un’erba aromatica e ho scelto la salvia perche tradizionalmente essa e’ usata per cucinare il tacchino qui in America. I Padri Pellegrini portarono qui  moltissime erbe dall’Inghilterra, e tra queste Prezzemolo, Salvia, Rosmarino e Timo erano particolarmente utilizzate in cucina, nella medicina, in cosmesi, e come tutti sanno per incantesimi d’amore. Sebbene quest’ultimo uso ai quei tempi avrebbe potuto procurare parecchi guai. La salvia e’ una delle mie preferite, mi piacciono il suo sapore e il suo profumo. Un tempo la si credeva capace di respingere il malvagio e attrarre fortuna e prosperita’, ma solo se coltivata assieme ad altre piante, non da sola; che garantisse salute, longevita’, perfino l’immortalita’. Curava la pelle, scuriva i capelli, rendeva piu’ saggi. Io sono sempre sorpresa dalla sua resistenza, anche adesso, nel mezzo dell’inverno, alle temperature gelide, la mia piantina ha ancora la capacita’ di portare alcune foglioline ancora verdi. sage 1 Infine, nel sugo ho aggiunto una  manciata di cranberries secchi, perche’ questi erano usati dai Nativi Americani che insegnarono ai Coloni a fare altrettanto. I cranberries si sono dissolti durante la cottura lunga e lenta del sugo, e il loro sapore si e’ armonizzato bene col resto.

Per la pasta ho seguito verbatim le istruzioni di Patty. Per il sugo servono:

500 g coscia di tacchino, tritata

1 cipolla grande

5-10 foglie di salvia, in base alla grandezza, tritate fini

4 cucchiai di cranberries secchi

sale

2 cucchiai di olio di oliva

125 ml di brodo (fatto con le ossa del tacchino e verdure, o solo di verdure, o di pollo, ma preferibilmente fatto in casa) + extra se serve

In una pentola di ferro ben calda si fa’ rosolare il tritato, poi si aggiunge l’olio e la cipolla tritata, si fa cuocere finche’ la cipolla e’ morbida e trasparente. Si aggiunge la salvia, mescolando per 1 minuto, poi i cranberries e infine si sala e si aggiunge il brodo. Si fa cuocere coperto, a fuoco bassissimo, per 4-5 ore, finche’ ben ristretto. Controllare spesso che non attacchi e aggiungere brodo se serve. Se si ha una piccola slow cooker, si puo far continuare la cottura, ponendovi il misto di carne rosolata e verdure col brodo per 8 ore su Low. Non servira’ brodo in piu’.

Ho preparato il sugo il giorno prima; si puo’ congelare benissimo. Ho servito i pici a pranzo in una giornata freddissima (—16 C) . Niente di meglio per combattere il freddo. Grazie a Patty per avermi insegnato questa pasta (ho gia’ scorte di sughi pronte in freezer per future repliche) e sempre grazie a Ale, Daniela & Giorgia per MT Challenge.

Bibliografia

Alice Cooke Brown. Early American Herb Recipes. (1994). Dover Publications, Inc.

Edith Van Allen Murphy. Indian Uses of Native Plants. (1958). Meyerbooks.

Marie Miczak, D. Sc., Ph. D. Nature’s Weeds, Native Medicine. Native American Herbal Secrets. (1999). Lotus Press.

Arancine with Sweet and Sour Cabbage filling (MT-Challenge November 2012)

Scroll Down for the Italian version

I am a very organized person. I like to plan everything–even things that cannot be planned. I face  life’s inescapable uncertainty  armed with to-do lists, inventories,  and schedules— with the firm belief that if you only are prepared, everything will be just fine. Or at least OK. Or maybe just  bearable. But anyway better than it would be otherwise.

This month’s recipe, Arancine, was definitely  something I could relate to, given my control freak nature  organizing abilities.  Each component of this dish could and should be prepared in advance, and then easily assembled. And yet I found myself scrambling the last couple days to put together something I had planned to make a month ago.
The thing is, I am not really that creative. I can execute a recipe, sure, fearlessly and skillfully—but I have never, ever invented a new dish all by myself.
I can put together different ideas, but chances are the end result will resemble more the culinary counterpart of Dr. Frankenstein’s monster than a breakthrough in gastronomic uncharted territories. So the MT Challenge really is challenging for me.

Pupaccena’s recipe for the November Challenge is Arancine. A Sicilian street food that, like all the  foods of that region, is  remarkably elegant in its baroque contruction. Pupaccena explained to us that in some areas of Sicily this dish is   called Arancine and they are considered “female”, shaped as rounds or ovals depending on whether they contain  a meat  or  butter filling, respectively. In other areas they are called Arancini and considered to be “male”, and are  definitely pointy in shape.
After a brief reflection on the Freudian implications of the shape and gender of those tasty snacks , I also realized that us English speakers would always pronounce their name “arancini” , no matter how it is spelled—same as we say linguini and fettuccini even if those are spelled “linguine” and “fettuccine”.  Sorry about that.
I asked my husband whether he had ever seen Arancine growing up in NYC, and he said no.  He remembers seeing them on the menu of a small Italian place in Somerville, Mass. in the ’90s–although he never tasted theirs. That restaurant has been closed for years now, and I do not recall seeing  Arancine mentioned on restaurant menus during any of our forays into Boston’s North End. But then again when we do go to the North End the only thing I can think of is getting to Mike’s pastry shop as fast as possible to buy as many cannolis as would feed an army. So in my cannoli-haze  I  just might not have noticed.
A Google search quickly showed me that this recipe apparently is quite popular here in the US—which goes to show that I do not know what I am talking about  and should not have a food blog in the first place.
Anyhow,  being at a loss about what to come up with for a filling that might even remotely make sense, I decided to rely on tradition. I mean, you can never go wrong with that, right?
So I made  Ashkenazic Jewish sweet and sour cabbage with apples to fill the arancine with, and baked some rye bread to make the breading. I used Texas-grown Arborio rice that worked like a charm and extra-virgin olive oil to fry the Arancine.

Well, I had never tasted Arancine before. And these were awesome!!!  The result was a savory morsel with an Eastern European flair, definitely a Winter flavor—and given the amount of snow we got here yesterday, they were right on the mark. My family ate them happily and no one said a word until dinner was over. We were all too busy enjoying those treats—conversation was an unwelcome distraction.

Thank you so much, Pupaccena. I saved some of these Arancine in the freezer. Hanukkah is coming up and those will be a wonderful addition to the 8-days long fried food extravaganza that awaits us. Frozen assets, indeed.

I followed Pupaccena’s wonderfully detailed and streamlined recipe for the rice and the assembly of the arancine.  I made the rice and the bread one day ahead, but the cabbage filling is best done two days in advance, as its flavors mingle and mellow to perfection.

Sweet and Sour Red Cabbage with Apples

1 red onion

2 lbs red cabbage

2 Granny Smith Apples

5 tbsp apple cider vinegar

1-1/2 tbsp brown sugar

1/2 cup water

2 tbsp oil

1 tbsp caraway seeds

salt

Shred the cabbage finely, chop the onion and the apple separately. Heat the oil in a cast iron pan and saute the onion until soft. Add the apple and the cabbage, the caraway seeds, salt to taste, the sugar and vinegar and finally the water. Stir until the cabbage begins to wilt slightly, then cover with the lid and let cook on very gentle heat for about 40 minutes, checking once in a while that it does not scorch. Better yet, if you do own a slow cooker (3-4 qt) transfer the mixture in the crock and cook on low for about 6 hours, until the cabbage turns silky.

Transfer the cabbage in a covered glass container and keep refrigerated until ready to fill your Arancine. You might have some leftover cabbage, but it is sooo good, either hot or cold, that it won’t be a problem, I think.

Rye Bread

3/4 cup water

2 tbsp apple cider vinegar

1-1/2 tbsp honey

1-1/2 tsp salt

1 generous tbsp caraway seeds

1 cup rye flour

1-3/4 cups white whole wheat flour

1-1/2 tsp active dry yeast

1 tbsp vital wheat gluten

Make a dough and let rise, covered, until doubled. Shape and place in an oiled bread pan and let rise until it reaches the rim. Bake at 350 F until golden.

Arancine Filled

I used my beloved cast iron wok to fry the Arancine

And, last but not least, Thank you so much Ale, Dani & Giorgia for hosting the MT Challenge every month.

Versione italiana

Sono una persona molto organizzata, che affronta l’incertezza della vita armata di liste, inventarii e tabelle di marcia e  con la convinzione che, avendo cura di essere preparati, andra’ tutto bene. O sara’ almeno OK. O appena sopportabile. Ma comunque meglio che se non ci fossimo preparati per ogni evenienza. La ricetta di questo mese, quindi, cosi’ ben suddivisa in step-by-step era particolarmente nelle mie corde. Eppure, mi sono ritrovata ad affrettarmi gli ultimi due giorni per fare questo piatto che avevo programmato da un mese.

La verita’ e’ che non sono creativa. Certo sono capace di eseguire una ricetta, senza paura e con una certa abilita’ anche, ma non ho mai, mai inventato una ricetta. Posso mettere insieme delle idee, ma e’ piu’ probabile che il risultato sia un mostro di Frankenstein culinario piuttosto che una scoperta che getta nuova luce nei territori inesplorati della gastronomia.

La ricetta proposta da Pupaccena, le Arancine, sono uno street food siciliano e come tutta la loro cucina ha una squisita eleganza barocca. Pupaccena specifica che in certe zone le arancine sono “femmine”, tonde od ovali a seconda del ripieno mentre in altre zone sono “maschi” e sono a punta.

Dopo aver brevemente riflettuto sulle possibili implicazioni Freudiane della forma e del genere attribuiti a questi stuzzichini, mi sono anche resa conto che per noi che parliamo inglese Arancine e arancini sono comunque pronunciate “arancinI”, cosi come diciamo linguini e fettucini. Mi scuso quindi se questa sfumatura sfuggira’ alla maggiorparte di noi.

Chiedevo a mio marito se crescendo in New York City ricordi di aver mai visto le arancine, ma mi ha detto di no, mentre ricorda che erano sul menu di un piccolo ristorante italiano di Somerville, MA, negli anni ’90.

Nelle nostre visite nel North End di Boston non mi ricordo di averle mai viste, ma daltronde quando andiamo li’ l’unica cosa a cui riesco a pensare e’ di arrivare il prima possibile alla pasticceria di  Mike e mangiare tanti cannoli che basterebbero per un esercito. Puo’ essere quindi che, distratta dai cannoli siciliani io non abbia fatto caso alle eventuali arancine.

Una ricerca su google mi ha dimostrato che sono un piatto conosciuto anche qui negli USA, il che dimostra che non so davvero di cosa sto parlando e non merito di avere un blog di cucina .

Comunque, alla fine attanagliata dal panico nel cercare di pensare ad un ripieno che avesse anche minimamente senso ho deciso di rifarmi alla tradizione. Cosi’ non si puo’ sbagliare, no?

Quindi ho preparato il cavolo rosso in agrodolce della cucina ebraica askenazita e una pagnotta di pane di segale per l’impanatura.

Per il riso, la procedura di assemblaggio e la frittura ho seguito la ricetta di Pupaccena. Ho usato un riso Arborio coltivato in Texas che ha funzionato ottimamente e olio extravergine di oliva per friggere. Ho fritto nel wok.

Ho preparato il riso e il pane un giorno prima, ma il cavolo va preparato 2 giorni prima in modo che i sapori si intensifichino col riposo in frigo.

Beh…non le avevo mai assaggiate prima le arancine. Sono fantastiche!!! Il risultato e’ stato un bocconcino croccante con un sapore Est-Europeo, certamente adatto ad un clima invernale e vista la quantita’ di neve che abbiamo avuto ieri, andavano benissimo.

L’intera famiglia le ha mangiate in assorto silenzio, erano troppo buone per distrarsi con la conversazione.

Grazie mille Pupaccena. Ho messo alcune Arancine in freezer. Hanukkah e’ vicina e saranno una gradevolissima aggiunta ai cibi fritti che mangeremo per gli otto giorni della Festa.

Un patrimonio congelato, nel vero senso della parola.

Cavolo rosso in agrodolce

1 cipolla rossa

1 cavolo rosso da circa 1 kg

5 cucchiai di aceto di mele

1-1/2 cucchiai di zucchero di canna scuro

2 mele Granny Smith

1 cucchiaio di semi di carvi

sale q.b.

120 ml acqua

2 cucchiai di olio

1. Far ammorbidire la cipolla tritata fine nell’olio, aggiungere le mele tritate fini e il cavolo affettato fine. Mescolare finche’ il cavolo inizia ad appassire un po’,

2. aggiungere zucchero, sale, aceto e acqua e far cuocere pianissimo, coperto per circa 40 minuti, o finche’ il cavolo e’ morbidissimo. Se avete una slow cooker, al punto 2 trasferite il tutto nella pentola e cuocete per circa 6 ore su LOW.

Conservare in un contenitore di vetro coperto, in frigo. Potrebbe avanzarne dopo aver farcito le arancine. Ma e’ cosi’ buono, caldo o freddo, che non penso sara’ un problema.

Pane di segale

180 ml acqua

2 cucchiai aceto di mele

1-1/2 cucchiai di miele

7 g sale

1 cucchiaio abbondante di carvi

120 g farina di segale

210 g di farina integrale

10 g di glutine

4 g di lievito di birra disidratato

Impastare il tutto e far lievitare coperto. Al raddoppio formare un apagnotta e porla in uno stampo unto di olio. Far lievitare finche’ raggiunge il bordo della teglia e infornare a 180 C finche’ e’ ben dorato. Usarlo il giorno dopo per fare le briciole con cui impanare le Arancine.

Le arancine in fase di farcitura

Il wok di ghisa

Come sempre, grazie mille a Ale, Dani e Giorgia per MT Challenge!!

Lemon-Marzipan Sweet Shabbat Bread (MT Challenge October 2012)

Please scroll down for Italian translation

For my  third and final version of Eleonora’s Sweet Shabbat Bread I used lemon marzipan, a confection that I usually make twice a year–for Purim and Pesach.  It is a rather sweet filling, reminiscent of flavors from the culinary tradition of the Jews of Greece. I sprinkled the top of each loaf with fennel seeds as their fresh taste pairs well with the lemony filling.


Lemon Marzipan

Peels of  10–12 lemons (well scrubbed)

5 -1/2 cups finely ground almonds

2 cups sugar

1 cup water

juice of 1 lemon

1/4 tsp pure almond extract

Soak the lemon peels in a bowl  with water to cover, keeping the bowl covered and stored in the refrigerator. Change the water 3–4 times during the day. On the third day, rinse the peels and put them in a saucepan with water to cover.  Simmer on low heat until the peels are very soft, about 1 hour. Drain the peels and grind them to a paste in a food processor.  Add the ground almonds and almond extract and process until well blended.

Boil sugar, lemon juice and water in a pan for about 10 minutes, until a thick syrup forms.  Add the lemon-almond mixture and cook over low heat for 3-4 minutes, stirring vigorously, until the paste no longer sticks to the pan. Let cool. Be careful not to overcook the paste or it will be too dry.

Dough

I followed Eleonora’s recipe with no modifications.  Divide the dough in 6 equal parts, roll each one in a long strip and spread with the marzipan, leaving a neat margin all around. Roll up jelly roll- style starting with one of the long sides, pinch well to seal.

Make two 3- strand braids, then coil each braid in a spiral as shown in the following picture:

Once the breads are light and puffy apply the egg wash (1 yolk mixed with 1 tbsp water), then sprinkle with fennel seed.

Bake in a preheated oven (350F) for about 30 minutes, until nice and golden. Cool on racks.


Here is a picture of a slice:


Italian version
La mia terza e ultima versione del Pane Dolce del Sabato ha un ripieno di marzapane al limone. Questo tipo di marzapane lo preparo normalmente due volte all’anno, per le Feste di Purim e Pesach.  Il ripieno e’ decisamente dolce, e ricorda i sapori della tradizione degli Ebrei di Grecia. Sulle trecce ho cosparso dei semi di finocchio, perche’ il loro aroma fresco si sposa bene con quello del limone e delle mandorle.

Marzapane al limone

Bucce ben pulite di 10-12 limoni

500 g di mandorle macinate finissime

400 g zucchero

1/4 l acqua

succo di 1 limone

1/4 tsp estratto naturale di mandorla

Tenere le bucce a bagno per 3 giorni, in una ciotola coperta e tenuta in frigo, cambiando l’acqua 3-4 volte al giorno.

Il terzo giorno scolarle, metterle a cuocere coperte di acqua nuova, a fuoco basso, finche’ sono tenere, per circa 1 ora.

Scolarle bene, e ridurle in crema in un mixer. Aggiungervi le mandorle e l’estratto e amalgamare bene.

Portare a bollore l’acqua con zucchero e succo di limone e far cuocere per circa 10 minuti, finche’ si ha uno sciroppo spesso. Aggiungere  il misto di mandorle e limone e cuocere per 3-4 minuti, finche’ la pasta si stacca dalle pareti della pentola. Non cuocere oltre o raffreddando si secchera’ troppo.

Impasto

Ho seguito la ricetta di Eleonora senza modifiche. Una volta pronto l’impasto si divide in 6 parti uguali, ciascuna si stende in una striscia e si spalma di marzapane, lasciando un po’ di margini. Arrotolare dal lato piu’ lungo e sigillare bene. Formare due trecce a tre capi e poi arrotolarle su se stesse a spirale, come nella foto:

Quando i pani sono ben lievitati (ci vuole un bel po’, perche’ l’impasto e’ ricco di  olio, uova e zucchero), spennellarli di tuorlo misto ad acqua e spargervi i semi di finocchio. Infornare come da ricetta e raffreddare su una grata.


Foto dell’interno:

Sweet Shabbat Bread with Lekvar Filling 2.0 (MT Challenge—October 2012)

Please scroll down for the Italian translation

This is just an update on my previous Sweet Shabbat Bread with Lekvar filling. The recipes for the dough and Lekvar are the same, the shape is not. To qualify for the MT Challenge it should be at least a 3-strands braid, which is what I have done this time. Once you shaped the braid, bend each end in opposite directions to form a sort of braided letter “S”, as shown in the following picture.

Image

and this is a picture of a slice:

Image

Versione Italiana

Questa e’ la stessa ricetta del post precedente, ma presentata con una treccia a tre capi come richiesto per l’ MT Challenge. Una volta formata la treccia a 3 piegare gli estremi in modo da formare una specie di “S”, come nella foto seguente.

Image

foto dell’interno:

Image

Sweet Shabbat Bread with Lekvar Filling (MT Challenge—October 2012)

Please scroll down for the Italian translation

Image

For this second version of Eleonora’s Sweet Shabbat Bread (MT Challenge)  I tapped into my own family’s Ashkenazi tradition. There is a lot of family stories I could share: grandmothers who survived pogroms in Odessa, a grandfather who deserted the Czar’s army (Jewish boys were drafted at the age of seven and had to serve for 15 years, in order to distance them from their culture and make them “more Russian”). In the Old Country they had been tailors, peddlers, and coppersmiths–with faith and resilience managed to survive in a world filled with violence, pain and unpredictability. Luckily, they all made it to America.

The filling for this bread is Lekvar,  a prune paste that is mostly used for Hamantaschen. I follow Aunt Leah’s recipe, made with prunes, lemon juice and honey slowly cooked together to a paste. But other versions call for orange instead of lemon, and are uncooked. You can also make it with 50% raisins, or use dried apricots instead of prunes. It is always delicious.

I added 15% of rye flour to the dough, as this flour is typically used in Eastern European breads, and I sprinkled the top with caraway seeds. If you never tried rye and caraway in a sweet bread, you should. It is really a great combination.

As for the shape, I made two large braided knots. They look nice and are very easy and quick to make.

The filling must be prepared at least 1 day ahead, so you need to plan accordingly. In fact, kosher cooking is not only about what and how to make, but when as well. Shabbat starts 18 minutes before sunset on Friday, and you need to be well organized to have everything ready on time.

Lekvar

1 lb pitted prunes

2/3 cup water

juice and zest of 1 large lemon

1/4 cup honey

Simmer all of the above on low heat, stirring, until jammy. Refrigerate overnight in a covered glass container. Bring it  to room temperature before filling the bread, or it will slow down the yeast considerably.

To shape the bread, you need to divide the dough in half. Roll each piece to make a long strip and spread it with half of the lekvar. Leave a clean margin on every side. Roll up jelly-roll style starting with one of the long sides, and pinch closed. Do it carefully, so it won’t burst open during baking.

Once you have your strip of dough all rolled up, lay it across your work surface and loop the left end under to form a circle, with the other end extended to the right

Image

then pull the extended end through the circle, as shown in the following picture:

Image

Twist the circle up and toward you, to form a second smaller circle, see picture #3 (as you can see, I had help myself):

Image

Finally, pull the end under and through the smaller circle you just made, leaving just the tip of it showing through:

Image

The result is a short and chubby–but very symmetrical, braid. You can leave it as is, or you can make a final step and produce a braided knot:

Fold the ends of the braid around in a loop and pinch them together, then place the braided loaf on an oiled baking sheet so that the seam is on the bottom.

Image

Repeat with the remaining dough. Let the loaves rise on an oiled baking sheet loosely covered with oiled plastic wrap. They will take some time to get nice and puffy–it took almost 3 hours in my kitchen.

When they are ready, apply the egg wash on the surface and sprinkle generously with caraway. Bake in a preheated oven at 350F until nice and golden. Cool on racks.

Here is a slice:

Image

Versione Italiana

Per la seconda versione del Pane Dolce del Sabato di Eleonora (MT Challenge)  ho fatto riferimento alla tradizione Ashkenazita della mia famiglia. Ci sono tantissime storie della mia famiglia che potrei raccontare, dalle nonne che sopravvissero ai pogrom di Odessa ad un nonno che diserto’ dall’esercito dello Zar ( i bambini ebrei erano arruolati all’eta’ di sette anni e dovevano servire per 15 anni, allo scopo di allontanarli dalla loro cultura e renderli “piu’ Russi”). Nel Vecchio Continente  erano sarti, commercianti ambulanti e artigiani del rame. Grazie alla loro fede e resistenza riuscirono a sopravvivere in un mondo pieno di violenza, dolore e incertezza. Per fortuna, riuscirono ad arrivare in America.

Il ripieno per il pane e’ il Lekvar, una pasta cremosa fatta con prugne secche e miele solitamente usata come ripieno per le hamantaschen. La ricetta e’ quella di zia Leah, che prevede prugne, miele, e limone cotti lentamente a formare una crema. Ma esistono versioni senza cottura, con arancio al posto del limone, o fatte con meta’ uvette e meta’ prugne, o sostituendo del tutto le prugne con le albicocche secche. In ogni caso, e’ delizioso.

Il ripieno va preparato almeno il giorno prima, ed in effetti cucinare Kosher non e’ solo tener conto del come e del cosa ma anche del quando. Il Tempo, il momento per fare o meno qualche cosa e’ essenziale nella nostra  religione: Shabbat inizia 18 minuti prima del tramonto il Venerdi’. Bisogna organizzarsi per poter avere tutto pronto per tempo.

Lekvar

500 g prugne snocciolate

160 g di acqua

succo e scorza grattugiata di 1 limone

4 cucchiai di miele

Far cuocere tutto pian piano finche’ si formera’ una pasta cremosa. Mettere in frigo coperto per una notte. Riportare a temperatura ambiente prima di farcire il pane, o la lievitazione sara’ molto rallentata.

Nell’impasto ho sostituito 75 g di farina con altrettanti di farina di segale, molto usati nei pani dell’Est Europa e ho cosparso con semi di Carvi  anch’esso tipico di quella tradizione. L’uso di segale e carvi nei pani dolci e’ poco comune, ma vale la pena provarlo.

La forma e’ un intreccio annodato, molto bello a vedersi quanto semplice e veloce da farsi, perche’ per ogni pane si parte da una sola striscia di impasto.

Una volta preparato l’impasto secondo la ricetta di Eleonora (sostituendo la segale come detto) e fatto lievitare la prima volta, dividetelo in due. Appiattite ogni meta’ con il matterello a formare una striscia molto lunga. Spalmatela con meta’ del Lekvar, lasciando un margine da ogni parte,  poi arrotolate partendo da uno dei lati lunghi e pizzicate bene per sigillare il ripieno all’interno.

Image

posizionate la striscia ripiena in modo da formare un cerchio con una estremita’ piu’ lunga a destra.

Image

Fate passare l’estremita’ lunga all’interno del cerchio e fatela uscire di lato

Image

Torcete il cerchio che avevate formato in modo da formare un cerchio piu’ piccolo

Image

Fate passare da sotto in su’ l’estremita’ che avevate lasciato sul lato attraverso il cerchio piu’ piccolo, in modo che se ne veda solo la parte finale. Avrete ottenuto una treccia corta e cicciotta ma anche piuttosto simmetrica.

Potete finire qui, o fare il nodo intrecciato semplicemente piegando le estremita’ della treccia in sotto, pizzicandole insieme e poggiando la pagnotta ottenuta sulla parte “pizzicata”.

Image

Fate lievitare le pagnotte su una teglia unta coperte di pellicola anche unta–ci vuole parecchio tempo, nella mia cucina 3 ore perche’ fossero pronte. Una volta ben lievitate, spennelatele di tuorlo e acqua come da ricetta di Eleonora e spargetevi sopra i semi di carvi.

Cuocere in forno a 200C finche’ ben dorate e raffreddare su una grata.

interno di una fetta

Image